Downloading Satellite Imagery With A Wi-Fi Antenna
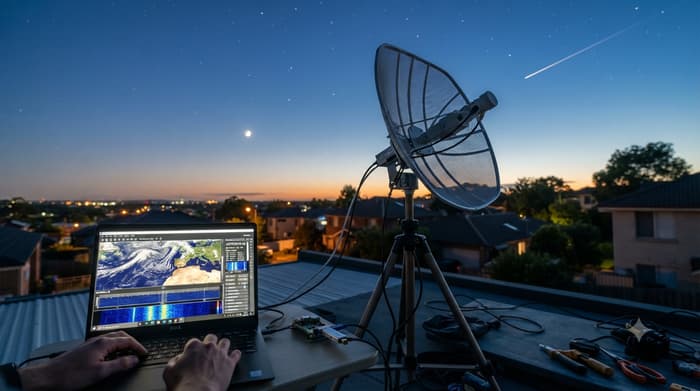
Downloading live satellite imagery directly from space is a popular project among amateur radio and weather enthusiasts. When people talk about doing this with a Wi-Fi antenna, they are almost always referring to a 2.4 GHz parabolic grid antenna (the grid mesh dish style often used for long-range Wi-Fi links).
See HACKADAY
While these antennas are manufactured for Wi-Fi, they can be re-purposed or modified to capture ultra-crisp, high-resolution imagery from geostationary and polar-orbiting weather satellites operating in the L-band (around 1.7 GHz).
See RTL-SDR
1. The Core Concept: Why a Wi-Fi Antenna?
Satellites like the US GOES series, Europe's Meteosat, or Russia's Elektro-L stream continuous weather data and full-disk images of Earth. They transmit this data on L-band frequencies, typically around 1694 MHz (1.69 GHz).
A standard 2.4 GHz Wi-Fi grid antenna is structurally a parabolic reflector. Even though 1.69 GHz is technically "out of band" for a stock 2.4 GHz feedhorn, the large metal grid mesh still acts as an excellent reflector for the 1.69 GHz satellite signals, focusing them onto the central pickup element (the feed).
Because the stock Wi-Fi sub-reflector isn't perfectly tuned for 1.69 GHz, many hobbyists perform a simple "GOES modification":
- They remove the plastic cover on the antenna feed.
- They slightly extend the internal metal dipole element (often using small copper strips or aluminum tape) to tune it closer to 1.7 GHz.
- They adjust the focal distance (the space between the small reflector loop and the main mesh dish) to maximize signal strength.
2. The Required Hardware Setup
You cannot plug a satellite antenna directly into a computer's Wi-Fi card to get images. Instead, the antenna is used purely as a raw radio wave collector, feeding into a specialized receiving chain:
[Satellite Signal: 1694 MHz]
           │
           ▼
┌──────────────────────────────────────┐
│  Modified 2.4 GHz Wi-Fi Grid Dish    │
└──────────────────┬───────────────────┘
                   │  (Coaxial Cable)
                   ▼
┌─────────────────────────────────────┐
│ L-Band LNA & Filter (e.g., SAWbird) │
└──────────────────┬──────────────────┘
                   │  (SMA Coax Jumper)
                   ▼
┌──────────────────────────────────────┐
│      Software Defined Radio (SDR)    │
└──────────────────┬───────────────────┘
                   │  (USB)
                   ▼
┌──────────────────────────────────────┐
│  Processing Unit (Raspberry Pi/PC)   │
└──────────────────────────────────────┘
- The Antenna: The modified 2.4 GHz parabolic grid dish.
- Low Noise Amplifier (LNA) & Bandpass Filter: Satellite signals are incredibly faint by the time they reach Earth. A dedicated LNA designed for 1.7 GHz (such as the NooElec SAWbird+ GOES) is placed right at the antenna to amplify the signal while filtering out terrestrial interference (like cell phone towers).
- Software Defined Radio (SDR): A USB dongle (like an RTL-SDR V4 or NESDR SMArt) that plugs into your computer. It takes the amplified analog radio waves from the antenna and converts them into digital I/Q data.
- The Computer: A Raspberry Pi or a standard PC to process the data.
3. The Software Chain: Turning Waves into Pictures
Once the raw digital radio signal enters the computer, dedicated open-source software takes over to demodulate, decode, and render the image.
- Demodulation & Decoding (goestools or SatDump): Software listens to the exact frequency (e.g., 1694.1 MHz). It locks onto the digital transmission protocol (like HRIT - High Rate Information Transmission) and translates the raw radio noise into structured packets of data.
- Packet Assembly: The software strips away the radio headers and stitches the individual data packets back together into raw image files.
- Image Processing: Programs automatically apply false-color enhancements (adding green to land and blue to oceans), overlay geographical boundaries, and save the final result as a standard PNG or JPEG.
4. Pointing and Calibration
Because geostationary satellites stay fixed in the same spot in the sky relative to Earth, the setup is a "set-it-and-forget-it" system once aligned.
- Azimuth & Elevation: You use an online calculator to find the exact compass heading (azimuth) and upward angle (elevation) for your specific geographic location.
- Polarization/Skew: The signal coming from space is linearly polarized. Because the satellite is looking at a curved Earth, you have to physically rotate the grid dish on its bracket (skew) to match the angle of the transmitting satellite's antenna.
- Fine-Tuning: Hobbyists look at a live software metric called the VIT Average (an error rate indicator). You gently nudge the dish fractions of an inch at a time until the error rate drops as low as possible, indicating a clean, locked signal.
Once properly aligned, the system can run continuously in the background, updating gorgeous, desktop-quality views of weather patterns, hurricanes, and full-hemisphere views of Earth every few minutes.
Links
- Donations
- DMS International
- BLOG
- Sathero Meters
- Ivy Stone Place
- Netflix Hidden Codes
- Free business software
FREE Satellite List
The free satellite list brought to you by Ivy Stone Place and our generous contributors and sponsors.
Attention Bloggers
Attention bloggers & website owners, follow.it is in your interest. You will get many more recurring visitors with follow.it.
Check it out here Follow it.
VA RESOURCES
- For any questions or requests,1-800-MyVA411 (1-800-698-2411) is always the right number.
- Veterans Crisis Line: 988 and press 1 , Chat, or Text 838255
- Vet Centers: 1-877-927-8387
- Homeless Veteran Resources: 1-877-424-3838 or Chat
- Ask VA
- Schedule a 1-on-1 Appointment with a VA Benefits Expert
- Find a VA facility near you
For non-urgent questions, you can reach VA using the VA Health & Benefits App or MyHealtheVet secure messaging to schedule an appointment, refill prescriptions, and access your medical records.
